Showing posts with label coconut. Show all posts

Saturday, January 30, 2010

Single-Serving Vegan Rice Pudding


When I woke up this morning, all I could hear was the tapping of rain against my window. I pulled down my blinds to see soggy grey clouds and umbrellas shuffling down the street; it made me immediately fall back into bed and pull the sheets over my head. Cold was already kissing at my cheeks. Schoolwork was already causing a tension headache. It felt like nothing could drag me out of bed. And then it donned on me, the comfiest of southern comforts that could revive even the most weather-worn northerners trapped in the south: RICE PUDDING.

The first time I can recall having rice pudding was about nine years ago. I was in North Carolina for a film festival, and one morning, there was a panel with a buffet trimmed in all the southern standards. I had just gone vegetarian a few months before, so the pickings were slim: drippy bacon over here, messy biscuits'n'gravy over there, home fries flecked with putrid pink ham. What was a vegetarian to do? But there, hidden in the corner, were these fluffy, fragrant dishes of gelatinous rice cozied with juicy little raisins that just called to me. Within one bite, I was hooked. My mouth reveled in the harmonies of flavors and textures, hints of cinnamon and cardamom mixed in a sweet cream delicately punctuated with rice grains. Oh, this was southern comfort, at its finest.

Suffice it to say, southern comfort is what makes me feel better about life down south, so rice pudding was definitely in order today. The best part about rice pudding is, it's extraordinarily easy to make. Even better, it's soooo adaptable. I make mine with brown rice and unsweetened soymilk so it's just as much about nutrition as it is about taste - and suitable for breakfast or dessert. I also make it without sugar. This recipe is single-serving because I've been super into single-serving dishes lately; they mean I don't have to worry about mindlessly snacking on leftovers, but more importantly, I can vary the recipe if I want to make it again. Thus, I offer a short list of variations afterward that I encourage you to experiment with. Get bold and come up with your own flavor combinations. (Then come back and tell me about them...)

Happy cooking!


SINGLE-SERVING VEGAN RICE PUDDING (REGULAR & SUGAR-FREE OPTION)

+ 1/2 c water
+ 1/4 c rice*
+ 1/4 c non-dairy milk
+ 1/2 t cornstarch
+ 1 packet Purevia**
+ 1/2 t vanilla

* I recommend short-grain brown rice. While more toothsome than its white counterpart, it has more starch than long-grain, making it more fluffy and sticky while still maintaining the health benefits of brown rice.
** I happened to have some packets lying around from a restaurant and didn't want to futz with figuring how much Stevia. If you want to use good ol' fashioned sugar - or sucanat or agave or maple syrup or whatever - 2 T should be about right.


01. In a pot on high heat, bring the water to a boil. Add the rice, cover, reduce the heat, and let simmer for about fifteen minutes. After fifteen minutes, there should still be a little bit of water but not much - at least, this is the case with brown rice.

02. Whisk together the soymilk and cornstarch before adding them to the pot of rice. Then add your sweetener and vanilla, raise the heat to about medium, and stir constantly as it comes to its second boil. Reduce the heat and return the lid, keeping a watchful eye and stirring occasionally to prevent any burning or clumping.

03. When your pudding looks ever so slightly thinner than your "ideal" pudding texture, pull it from the stove and switch it to the fridge. (It will thicken as it cools.) Be sure to use a wire shelf/remember to put a pot holder beneath your pot! If you want to enjoy your pudding warm, it only needs to sit in the fridge for maybe three minutes. Otherwise, give it at least an hour before savoring most serenely.


VARIATIONS
coconut rice pudding: substitute coconut milk for your usual "milk." Sprinkle with cinnamon and serve with sliced bananas.

chocolate rice pudding: when adding the milk and cornstarch, throw in a tablespoon of cocoa powder, too. For a richer chocolate experience, add 1/4 - 1/2 t almond extract, and for REALLY decadent rice pudding, toss in 1 - 2 T chocolate chips. To make it seasonal, try peppermint extract instead of almond.

berry rice pudding: in the last five for ten minutes, toss in a handful of your favorite frozen berries and maybe 1/2 t lemon juice. Give 'em a gentle stir, and let their flavors BURST onto every rice grain. This would be an excellent way to start the day.

chai rice pudding: add 1/2 t cinnamon, 1/4 t cardamom, and a splash of ginger, clove, pepper, and nutmeg when adding the milk. You might also try mixing chai concentrate with the milk before adding it or cooking the rice in brewed chai tea instead of water.

pumpkin rice pudding: mix together 1/8 c pumpkin puree with 1/8 c soymilk and omit the cornstarch. Use brown sugar as a sweetener and add 1/2 - 1 t pumpkin pie spice. Perhaps substitute (or add!) almond extract for vanilla.

Indian rice pudding: substitute the coconut milk for your usual "milk," and add a handful of raisins in the last five or ten minutes of cooking. Serve with a dash of cardamom and ground pistachios.

lemon rice pudding: add the finely ground zest of one lemon along with the water when cooking the rice. When adding the milk, add 1 - 2 tsp rum/rum extract. To make it a little fruitier, add dried cranberries in the last five or ten minutes of cooking, or serve with fresh raspberries or strawberries.

Italian rice pudding: add a splash of amaretto with the milk (or almond extract and a half t sugar). Then throw in chopped or finely ground hazelnuts (about a handful) five minutes before serving. Enjoy lightly dusted with cocoa and cinnamon with a soy latte on the side.


How do you make your rice pudding?

Wednesday, January 13, 2010

Tropical Gluten-Free Muffins


Believe it or not, I've actually been generating a lot of content for this here blog; I just haven't been posting it. Part of it is that, you know, I get ideas but I don't type them. Mostly, though, I've been developing TOP SECRET RECIPES that I think I'll put online and then decide I'd rather preserve for my zine. I know that I win World's Most Unreliable Blogger (what with promising you cookie recipes and then not updating for a month), but believe me, my little darlings, I have not forgotten you.

In fact, I've so far from forgotten you that I thought the best way to kick off the new year would be with a super healthy recipe. Year after year, the number one New Year's Resolution is "lose weight," but I prefer the more health conscious goal of "eat better, get fitter." After all, if you're eating properly and getting regular exercise, your body will naturally settle at a healthy, sustainable weight - no calorie counting required. So with that in mind, I decided to make some improvements in my own lifestyle: no more high-fructose corn syrup; no more hydrogenated oils; and no more artificial sweeteners. Right now, I'm also experimenting with completely wheat- and sugar-free cooking, and though it's only been maybe a week (I'm trying to make it at least month), I'm feeling pretty good. Some improvements I've noticed are my skin being a little clearer, my energy being a little more even, and my focus being a little better. This is all conducive to my ultimate 2010 goal: looking like Linda Hamilton a la Sara Conner in T2. Gotta have priorities, right?

So with these new(ish?) lifestyle efforts in mind, I conjured this recipe for gluten-free tropical bran muffins. I made some similar to these before I came back to school two weeks ago, and while those were just pineapple, they were amazing - amazing! Unfortunately, I didn't write down the recipe, and they were full of a little bit of sugar and a lot of wheat. Obviously, these babies have none of those things - just lots of good-for-you fats, fiber, and protein. They've got a little added sweetness from a scant half cup of maple syrup, but most of it comes from the tropical fruits, sweet flours, and coconut oil. These muffins get a nice, crisp exterior with a dense but fluffy interior. Plus, their tropical flavors warm your mouth on cool winter days, teasing you with daydreams of summer. Enjoy with some cold juice or an aromatic tea.


GLUTEN-FREE TROPICAL BRAN MUFFINS
+ 1 c oat bran
+ 1/2 c coconut flour
+ 1/4 c sorghum flour
+ 1/4 c brown rice flour
+ 1 tsp xantham or guar gum
+ 2 tsp baking powder
+ 1 tsp baking soda
+ salt
+ cinnamon
+ cardamom

+ 1/2 c coconut oil
+ 1 1/2 c "milk" or water
+ 1/2 c maple syrup or agave
+ 1 tsp vanilla

+ 1 - 1 1/2 c fresh or frozen tropical fruit

01. Preheat the oven to 350º, and sift together the dry ingredients (bran through cardamom). Sifting can produce a lighter, fluffier baked good, but it can also make the ingredients more evenly distributed, which yields more uniform and delicious baked goods. If you don't want folks fighting for the bigger muffin or biting into a nugget of baking soda, sift your ingredients.

02. Cut in the coconut oil with a fork until you have a bowl of crumbles, then add the rest of the wet ingredients. Stir until well combined. Your batter should look like a medium between cupcake and biscuit batter - maybe somewhere in the scone neighborhood but, you know, not like your typical muffin batter. Now, the cool thing about gluten-free baking is that you can stir and stir without much concern with how all that stirring will affect the texture. The fact is, it won't, really, because no gluten is forming! So add that fruit, then stir some more.

03. Grease or line a muffin tin, and then plop that batter in there. Feel free to fill the containers almost completely full because these babies don't get a lot of rise. Then throw them in the oven for twenty to twenty-five minutes, rotating them 180º halfway through the baking process. A fork or toothpick won't necessarily come out clean when these are ready, but the tops will look firm and maybe even a little brown on the edges. (Pull them before they get too brown!) Your oven will also RADIATE with the smell of these wonderful (and wonderfully healthy!) treats.

04. Let the muffins cool completely before enjoying. This is important because, while I'm with you on enjoying certain things all hot from the oven, these can still seem a little wet when they're fresh from the oven - kind of in the same way cookies are still all soft when you pull them. That cooling part's important. You can let them cool in their tray for five or ten minutes, then pop them out and transfer them to a cooling rack or even a plate. (Obviously, cooling rack gets preference.) Give them maybe a half hour, then grab some tea and a good book and dig in.


Makes twelve to fifteen muffins.

Thursday, March 5, 2009

Coconut Whipped Cream... the Redux! (Plus Noodles)


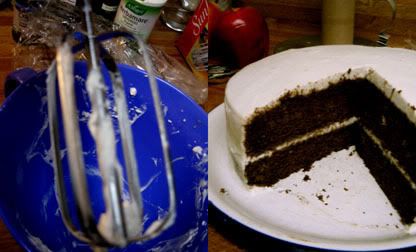
It's been a week without updates, and what do I do the next time I log in but revisit coconut whipped cream. Yesterday was my dad's birthday, and he's pre-diabetic so I made a special cake with this in mind. It was free of just about everything a traditional cake might entail: gluten, eggs, dairy, sugar, nuts... You'd think it'd be pretty lackluster, but I've certainly had worse cakes. I think the recipe could use some tweaking, so I'm not prepared to share it yet, but I do want to discuss the frosting because it was just my coconut whipped cream. This time, though, I introduced the concept of a hand mixer and extra Whip It, and oh, what a difference they made!

I prepared the frosting much per my previous instructions (cans in the fridge, separating the cream, etc. etc.), but instead of doing a 1:1 ratio of coconut cream to Whip It, I did about a 1:1.5 ratio. So in total, I used three cans of coconut milk and four packets of Whip It. I also omitted the powdered sugar (because this was a sugar-free dessert!) and substituted agave nectar (maybe a tablespoon or two?). Combining everything with the hand mixer made it really light and fluffy like whipped cream, but the Whip It held it together nicely. It was thick and full-bodied, and the vanilla over-rode much of the coconut flavor. Really, it was quite the vegan forgery.

Now, I didn't make enough whipped cream for piping (besides which, I didn't have my piping tools), so I can't say how well it'd hold up for decorating. (I speculate it would be fine, but anyone with high decorating aspirations that doesn't want to chance it should try Diet, Dessert, and Dogs' Whipped Cream.) However, as a frosting, it was spectacular - easy to apply, simple to smooth. I don't have an offset spatula or cake... spinny... thing, and I didn't do a crumb coat or an ace job of leveling my cake top, either. Still, when one of my roommates saw the cake sitting on the counter, she said, "Wow, that's a smooth cake!" Frankly, without the aid of fancy tools, I'd say this is the most forgiving frosting I've ever worked with - and it's pretty effin' good for you as far as frostings go. Plus, as our last entry established, you don't have to use it for just frosting because, duh, it's really whipped cream. Be glad I revisited this one.

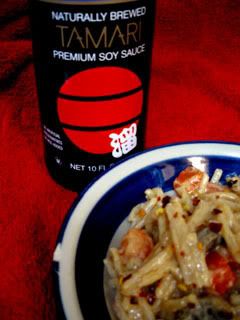
Okay, so if you've been making as much whipped cream as I have, you've got all these half-used cans of coconut milk in your fridge. I've been making Thai peanut noodles to get rid of them. Please note these measurements aren't exact because I do everything to taste. It says to do the pepper to taste since everyone's so picky about their spice level, but really, do everything to taste. These were guestimations:


THAI PEANUT NOODLES
+ 12 oz spaghetti
+ 1 red bell pepper, diced
+ 3 cloves garlic, minced
+ 1 c mushrooms, sliced
+ 13.5 oz coconut milk (or roughly two leftover cans)
+ 1/2 c peanut butter*
+ 4 T soy sauce
+ 1 T apple cider vinegar
+ 1 1/2 t ginger
+ cayenne pepper, to taste
+ red pepper flakes, to taste

01. Prepare your pasta per package instructions. Before draining, be sure to set aside just a little bit of pasta water. Later, you're going to add about a tablespoon or so to the sauce because it'll help the sauce gel with the noodles.

02. Oil up a large fry pan, and put it on the stove over medium heat. Once warm, toss in the pepper and garlic, and sautee until a little glossy. Add the mushrooms, and continue cooking until the mushrooms are gently browned.

03. Turn up the heat to medium-high. Pour in the coconut milk, soy sauce, peanut butter, vinegar, and spices. Gently stir to combine and bring to a boil.

04. Once boiling, bring the heat back to medium (maybe even medium low!), and continue cooking until some of the liquid cooks off and a thin skin begins to form on the surface. Stir periodically.

05. Once the sauce has significantly thickened, add that pasta water, cook a little more, and then add all the pasta. Turn off the heat, and toss the pasta to coat. Serve hot or cold.


This recipe feeds two to four and tastes even better the second day.

* If your peanut butter does not come sweetened, consider adding about a tablespoon of sweetener. Sugar is always a component of Thai cooking, and I think it adds to this dish.

Tuesday, February 24, 2009

Coconut Whipped Cream: A Variation on an Old Theme


After eating about seven scones and nearly a quart of chik'n noodle soup yesterday, I was feeling pretty guilty when I woke up this morning. Today would require modesty and balance, I decided. The day had been going pretty well, and making fruit salad for dinner made me feel like a good little vegan. But then my demon sweet tooth kicked in and said, "How about a little whipped cream on that salad?" I think it goes without saying that whipped cream is to fruit salad what Ranch is to vegetable salad.

However, I had recently read about Vegan Dad using coconut cream as, essentially, whipped cream. I'm pretty sure he's not the first vegan to do this, but actually looking at it on some of his delicious treats, I thought, "What an inspired idea!" When I was grocery shopping Sunday night, I bought a can of coconut milk for this express purpose, and since coconuts are pretty good for you in moderation, I reasoned it was okay to include them in my fruit salad.

Also in the "international" aisle Sunday night, I noticed a German product called Whip It, which advertised itself as a stabilizer for whipped cream. At the time, I thought of using it for custard-y/mousse-y type things, but when I sat down to make my whipped cream tonight, it occurred to me that perhaps this would help it achieve a texture closer to the one I remember. Having also purchased some rose water in the international aisle (seriously, best spot in the grocery store, especially if you're vegan), I decided to make a vanilla version and a rose water version. They were both successful (not that I had many doubts), and I will definitely be using Whip It in other confections.


WHIPPED CREAM
+ 1 can coconut milk
+ 4 tbsp confectioner's sugar
+ 1 packet of Whip It
+ 1+ tsp flavor of your fancy

01. Keep the coconut milk in the fridge until you're ready to use it. When it's time, the water and cream will have separated, and you can just scoop the cream off the top. Put that in a bowl, and add to it the confectioner's sugar, Whip It, and flavoring.

02. According to the Whip It packet, it needs some vigorous action to get it going, so stir with enthusiasm to combine these ingredients. I did mine for a minute or two, but you can go however long you need to, hot shot. After all, the longer you go, the more beautiful your xveganx muscles will be.

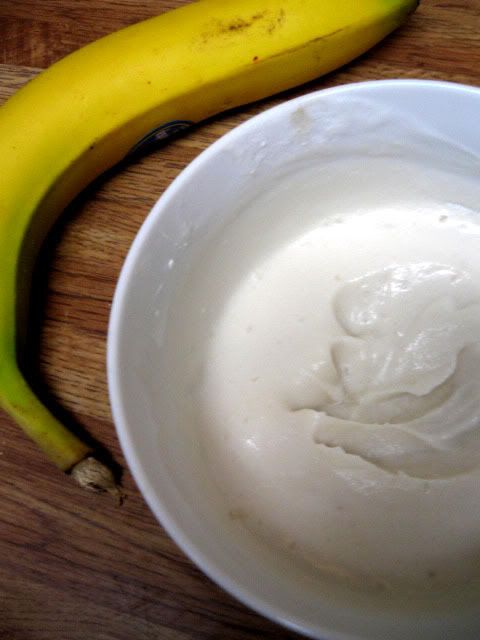
03. Serve immediately or return to the fridge so the whipped cream can set. To illustrate my point, the first picture in this entry immediately followed making the whipped cream, but after about an hour in the fridge, I ran a fork through my cream and it left a fork print. Texturally, I preferred the latter, but it doesn't make a big difference either way. Enjoy!