There are certain ingredients I almost always have on hand - stuff like carrots and celery, soy sauce and olive oil. I keep a pretty generic inventory, but when it comes down to the real STAPLES of my cooking, the food and flavors that take priority, there's definitely an Italian slant. A good cook would probably die without the holy trinity, the foundations of so many cuisines, the carrots, celery, and onion that make mirepoix. I, on the other hand, feel forlorn when I open my vegetable crisper, and I can't find mushrooms, spinach, peas, and (okay, sometimes) artichoke hearts. I always have cans of crushed tomatoes in my cupboard ready to spring into action at a moment's notice. What, you need some marinara? How about just a generic tomato base for that rice? And the cornerstones of my spice rack - the grandfathers for all my seasonings - are easily basil and oregano (which don't belong together in marinara unless you're using it for pizza, BY THE WAY).
I'm from an Italian household and grew up on Italian cooking. (With a name like Micco, would you have ever guessed otherwise?) For Italians, food and family go hand in hand. My dad taught me the marinara that his mother taught him, which her mother (in law) taught her, and so on. Some kids brought PB&Js or Lunchables to school, but my lunchbox came with tupperware containers of leftover lasagna or subs filled with meatballs my dad and I made together. One of the first things I learned to make was fettucini alfredo, and how much garlic was too much garlic, was an issue of constant debate in my household. When I went vegan four years ago, my dad felt thrown for a loop. Coming from a culture covered in cheese with bits of meat floating around in it, this way of eating was completely foreign to him. It wasn't such a big deal as a vegetarian, but a vegan? I kid you not: he was worried he'd have to write me out of Christmas dinner.
My dad's correct, in that a lot of what's hit my plate in recent years is totally different from what I grew up on. (I mean, did I really used to eat beef tacquitos...?) I think it's funny when people ask what vegans eat because, after going vegan, I think I've tried more foods from more countries with more exotic ingredients than most omnis. Still, as my palate has expanded and matured, I've always come back to my roots. The recipes have changed a little, but the food hasn't (I now have vegan versions of most of my great grandma's Christmas cookies!), and it's been kind of special teaching my family new takes on the things they've taught me.
One thing we ate a lot in my family was stuffed peppers. The filling formula was basically: grain + veggie + sauce + cheese +/- meat. Now currently, I'm trying to make up for a lot of the bad eating I did at school - save some calories, up the quality, you know - and I thought, Why not update those peppers to reflect that? The flavors in this are very generic Italian, but to appease my current eating goals, I substituted mashed cauliflower for the grain and mixed it with vegan yogurt for a rich but healthy meal. I think it packs a lot of flavor for how spare it is on the calories (probably around 200 per pepper), and it's a nutrition powerhouse that will leave you quite satiated. Serve it with a side of green beans in light olive oil with minced garlic and maybe some crusty ciabatta, for a truly Italian feast.
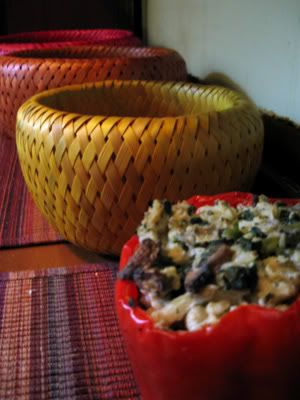
STUFF-YOU-FULL-O-GOODNESS STUFFED PEPPERS
+ 2 bell peppers
+ 1/2 head cauliflower
+ 3 - 4 mushrooms, finely diced
+ 1/3 c frozen spinach
+ 3 - 4 frozen artichoke hearts
+ 1/4 c plain vegan yogurt*
+ 1/4 c nutritional yeast
+ 1 - 2 T white wine
+ garlic powder (or 1 clove of fresh garlic, minced)
+ dried Italian herbs (dealer's choice)
+ white pepper
+ salt
01. Preheat the oven to 375˚. Cut the tops off the peppers and scrape out those insides. Lightly oil a baking dish (I used a loaf pan since there were only two) and the sides of the peppers, then place them in the dish, and pop them in the oven for fifteen minutes. (Note: some people put the tops back on their peppers and cook them that way, but you can also chop the tops up and use them for salads or stir-fries later. OR roast them with your peppers, but then save them for tapenade - or maybe a Mediterranean influenced sandwich or pizza? Yum.)
02. While your peppers roast, set a pot of water to boil for your cauliflower. Break down your cauliflower half into its little florets, and steam them until super soft. Of course, if you're like me and without a steamer at the moment, you can just boil them mushy and then drain the excess water, but steaming is better because it maintains more nutrients.
03. Transfer your cooked cauliflower to a bowl, and use a sturdy fork to mash it up. You don't want a texture quit as smooth as mashed potatoes (pre-liquid, of course) but it shouldn't look like renegade floret crumbles, either. This dish is meant to be creamy, but the cauliflower is subbing for grain here, so it should be at least slightly toothsome. Then add your yogurt, nutritional yeast, wine, and seasonings (to taste). If you're using garlic powder, this is when you add it, too.
04. Back on the stove, heat up a skillet with some oil over medium heat, and saute your mushrooms. Toss in your spinach and artichokes, and continue cooking until the mushrooms and spinach darken and the artichokes begin to soften. Use your spatula to separate the leaves a little; no one wants to eat a pepper stuffed with nothing but chunky bits of whatnot, but there needs to be a variety of textures and flavors. Then transfer your veggies to your cauliflower bowl, and give it some quick stirs to incorporate all the ingredients.
05. At this point, your peppers should be finished with their first round in the oven, so start filling them. Fill them as high as you want. Fill them until they're practically overflowing. (If you're really daring, save a little room a crumb-coat topping, and put it on half way through the peppers' baking.) Add a little bit of water to the bottom of your baking dish - just enough so the peppers' little butts don't dry out or cook funny (maybe a quarter of an inch). Then return the peppers to the oven, and cook them for an additional thirty minutes. Let them cool, then stuff yourself. (Ooooh, I'm so witty...!)
This makes two peppers, which I guess could be split four ways, but these are so good, who would want to?
* This is roughly the amount that I used, but my filling turned out a little dryer than some might prefer. However, I'm really trying to make up for my bad eating, so I'm trimming calories where I can, and, well, vegan yogurt has a lot of calories. At this amount, I'd say these peppers "taste like health food" (sort of) but increase it a little and they'll border on decadent. It's your call. To spare even more calories, substitute marinara.